Thursday, November 8, 2012
Binding
My earliest quilts had completely machine sewn binding, if you could call it that! Basically, I cut the backing wider than the front, folded it over a couple of times, and then machine sewed it down. It looked pretty horrible -- partially because I also didn't measure my borders carefully back then, so there were some pretty wavy edges to begin with. Eventually, I moved on to cutting the binding separately and machine sewing it to the quilt. I didn't have a way with dealing with corners, and I also didn't know how to sew the binding strips together diagonally, so I ended up with these really bulky corners and seams.
When I finally started reading the multitude of information available on how to cut and sew a double-folded binding, I couldn't believe that I had avoided it for so long, thinking it was too "hard". There are so many great tutorials online -- here's one if you're not familiar with the process. Although for the longest time, I had to have the instructions handy to remember the steps everytime I had a binding to do, I think I could do them in my sleep now!
My next battle, however, was blindstitching it to the back of the quilt. I've never been a great hand sewer -- all of my attempts at hand quilting have failed miserably, and my applique stitches are definitely nothing to brag about. I hand sewed a lot of bindings, but I wasn't too happy with the stitch, until one day when I changed one little thing by accident, and it was like I had a binding breakthrough! (don't ask me what it was, because I have no idea!) Anyway, after that moment, I was happy with my binding stitches!
I truly enjoy the process of hand sewing a binding. I like to have something to do on long car trips (highway driving -- not windy roads!). I bring quilts to soccer games, meetings, and doctor's appointments, and I love having something to bind when I watch TV. I think I even enjoy spending all that time with the quilt, especially since so many of them go off to new homes shortly thereafter.
However, the process of hand sewing does take time -- in fact, it is usually the longest single time element in the piecing, quilting and finishing processes. From a business standpoint, I've wondered if machine sewing the binding would be a better option. There are some great tutorials -- I particularly love the way Rita's machine sewn bindings come out -- she has a really unique and professional looking technique. I suspect, however, that the reason hers are so nice are that she invests a lot of time in them. So, my battle always ends with picking up the hand-sewing needle, and enjoying the process!
I have binding on the brain, because that's what I've been doing the past five nights! In anticipation of possible power outage due to Hurricane Sandy (we were thankfully out of the path of the storm, as it turns out), I quilted a bunch of tops, and prepared the bindings so they were ready for hand stitching. It has been so cold the last few days that my project of choice every evening has been to sit in the toasty warm living room wrapped in a quilt that needs binding!
Tonight's finish was a second "Ahoy Matey" quilt. This is a brand-new fabric collection by Michael Miller Fabrics, and it is just so fun and cheerful. I love the combo of navy, aqua, and orangey-red. The center panel is actually sold as 24" wide, but I chose to purchase three panels, and cut them down the middle. The ship is centered differently on the second quilt I made, which I think adds to the fun, modern look. The larger width definitely helped the overall proportions -- I'm not a fan of skinny, long quilts.
Last night's finish was this Parisville (by Tula Pink) quilt made from my new pattern "Beads and Baubles".
And the night before that, I finished this Peak Hour quilt in my Hip to Be Square pattern. I have one more quilt from the pile to bind, and then I need to restock for Thanksgiving week car rides, etc!
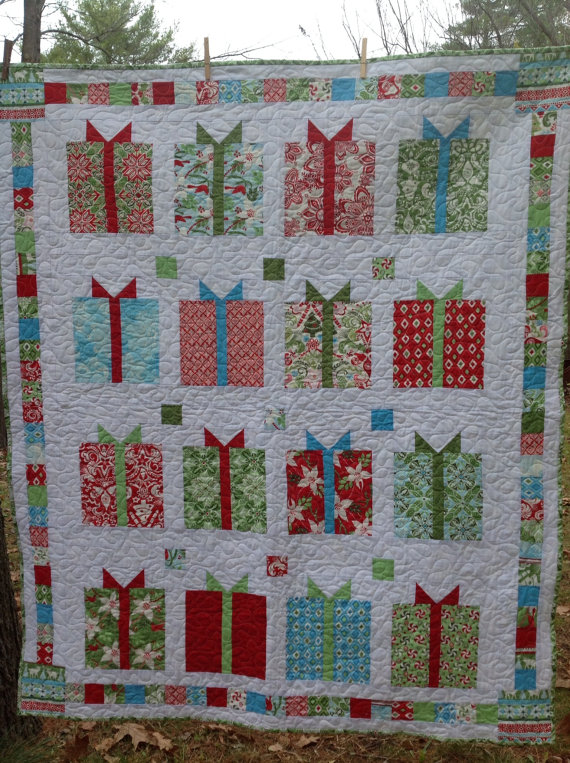
On an exciting note, I had an unexpected visitor to my blog the other day! In my last post, I started with some pictures of the quilt I just completed using Kate Spain's "Flurry" fabric collection. I was honored, and a bit star-struck, to discover that Kate had stopped by the blog and taken the time to leave me a lovely comment on the quilt! It is no secret that I am a huge fan of Kate's fabric (as well as her blog) so it was absolutely thrilling to find out that she stopped by! Of course, it was a little like when someone stops by your house unexpectedly, and you wish you'd taken the time to fold the laundry or do the dishes earlier in the day! I haven't taken advantage of the "labels" aspect of blog posts, and now I wish I had labeled all of my posts so that Kate could have seen some of the other quilts I made with her fabrics. I plan to do some labeling this weekend in anticipation of the next unexpected visitor, but in the meantime, here is a little collage I made using PicMonkey:
Thank you for stopping by, Kate Spain! It was an honor having you here!
Monday, November 5, 2012
Momentum
Sunday, November 4, 2012
Checking In!
Lest you think I have been idle, here is a little collage of what I've been working on this past week:
Monday, October 15, 2012
Show and Tell
This summer, I enjoyed joining in on the Great Granny Quilt Along (see button on sidebar for a link to the Flickr group). Lori Holt of Bee in My Bonnet posted this great tutorial on how to make these 12 inch crochet-inspired blocks. Granny Squares were one of my favorite things to make when I crocheted (before I discovered quilting!) so I was excited to try this pattern as a way to use up some Tula Pink Parisville scraps. At first, I was only going to make a block or two a day, but I quickly became obsessed with them! It's hard to stop making them, because each one comes out so unique, and you can't wait to see what they'll look like!
I've got a new batch of custom orders, including more Backyard Baby -- quilted, and ready to be bound tomorrow night!
Sunday, September 30, 2012
Checking In...
This was a custom order request that began with a lampshade and a sea-themed nursery. The challenge was to create a quilt to match the lamp (pink, aqua, green) and coordinate with the nursery (purple, yellow and lavendar). I was a little stumped on what fabric to use, until I remembered the brand-new collection by Chez Moi called "Coquette". The colors were perfect, and I was able to add in some of Sarah Jane's "Out to Sea" anchors fabric in pink and yellow. I also appliqued a sea horse
And an octopus:
For the octopus applique, I used this tutorial. I really liked the design of the octopus -- not too scary, and not too cartoony. I did enlarge the pattern a bit so the applique would occupy a large corner of the quilt. It feels good to have this project (almost!) done -- I still need to sew on the binding. I dragged my feet on it a bit because I was second-guessing fabric choices for the applique, but in the end, I chose Kona solids in colors that coordinated with the Coquette fabrics.
The second finish of the day is this Reunion pillow cover, made to match another custom order Reunion quilt!
Sunday, September 23, 2012
Projects to Share!
This quilt is based on my When the Stars Align pattern, which I have to say is my favorite of all the ones I've designed. It's also the most time-consuming to make because of all the half-square triangle blocks involved. Not a difficult task -- just labor intensive! This is the first full/queen size quilt I've made from the pattern, and it was basically like making 2 1/2 lap quilts! (The lap size version has 12 blocks -- the full size has 30 star blocks!) 30 star blocks translates to 360 half square triangles! Once I finally got the pieces made and the top sewn together, it took several hours to quilt, and several episodes of Project Runway to bind!
I love the way it turned out, and I'm dying to make the pattern in so many other fabric collections, but that will have to wait until I catch up on some unquilted tops!
So once this quilt was dropped off at the post office, I found myself in a brief "custom-order free" state! I actually have one more custom quilt in progress, and two more orders in the planning stages, but since I am waiting for additional materials for the one in-progress, for the first time in weeks I was able to work on any project I wanted to!
This "Children at Play" baby boy quilt was a quick, easy finish! The top was already done, and the quilting went fast -- I just need to bind it later this week. I'm super happy with this one -- the colors are so nice, and I found flannel fabric for the back in the same orange bicycles print.
Sunday, September 16, 2012
Stash Hoarding, Day 5: It's A Hoot
Today is the final day of my Stash Hoarding Top Five list, although I think I should include some "honorable mentions" later this week (let's face it -- I hoard a LOT of fabric!).
There are certain fabric designers whose work I would buy sight unseen, just because I've loved everything they've done. Momo (for Moda Fabrics) is one of them. The first quilt I ever sold on Etsy was made from Momo Wonderland fabric:
I've made and sold at least 5 or 6 of these quilts, and stocked up on quite a bit of Wonderland along the way. I think I'm over the hoarding of it, however -- I had the opportunity to add some to my stash this week and chose not to! The next collection was Freebird, and I thought this one was a lot of fun, too. The first quilt I made in it sold very quickly:
I made a couple of other Freebird quilts, but decided to try separating the bright colors with a neutral fabric. I do really like the way the solid sets off the wild fabrics.